


Intro
Whether you’re cycling to work, heading to the shops or enjoying a weekend ride, a puncture is something every cyclist will experience eventually. While it can feel frustrating the first time it happens, fixing a bike puncture is one of the simplest maintenance skills you can learn.
📋 Article Summary
🛣️ Topic: Bike Pucture Fix
🚴 Best For: Adults New to Cycling & Returning Cyclists
📈 Difficulty: Beginner
🎯 You’ll Learn:
- The tools you’ll need.
- How to remove your wheel safely.
- How to replace or repair an inner tube.
- Common mistakes that cause repeat punctures.
- Practical tips from years of real-world cycling experience.
📍 Quick Answer
A bike puncture fix is usually quicker and easier than most cyclists expect. In most cases, you’ll need to remove the wheel, inspect the tyre for whatever caused the puncture, replace or repair the inner tube, then carefully refit the tyre before inflating it. Once you’ve practised the process a couple of times, most punctures can be repaired in around 15–20 minutes.
| Roadside Repair | At Home Repair |
|---|---|
| Replace the tube | Patch the punctured tube |
| Inflate enough to ride safely | Inflate to full pressure with a track pump |
| Quick visual inspection | Thorough inspection of tyre and rim |
| Get back on your ride | Prepare your spare tube for next time |
Why Every Cyclist Should Learn to Fix a Bike Puncture
Few things spoil a ride faster than the unmistakable feeling of a flat tyre.
One minute you’re enjoying the ride and the next your bike starts feeling sluggish, the steering becomes unstable or you hear the familiar hiss of air escaping from the tyre.
The good news is that a puncture doesn’t have to end your journey.
Whether you’ve ridden over broken glass, picked up a thorn or hit a pothole hard enough to pinch the inner tube, learning how to fix a bicycle puncture is one of the most valuable skills any cyclist can develop.
It’s also much easier than many beginners expect.
With a few basic tools and a little practice, you’ll be able to repair most punctures in less than twenty minutes and continue your ride with confidence.
Better still, it’s a skill that can save you both time and money. Rather than pushing your bike home or paying someone else to repair it at a local shop, you’ll know exactly what to do wherever the puncture happens.
What You’ll Need
Before setting off, it’s worth carrying a small puncture repair kit. It doesn’t need to take up much room and could save you from a long walk home.
For most bikes you’ll need:
- A spare inner tube
- Two or three tyre levers
- A mini bike pump or CO₂ inflator
- A puncture repair kit
- A multi-tool (if your wheels don’t use quick-release or thru-axles)
- Disposable gloves or hand wipes (optional)
Many cyclists wonder whether they should carry a spare tube or just a puncture repair kit.
While a repair kit is useful, replacing the tube is usually much quicker when you’re beside the road. You can always repair the damaged tube later at home and keep it as your spare for next time. This also saves you spending more time out in the cold than is necessary, and can save you from being late to the office.
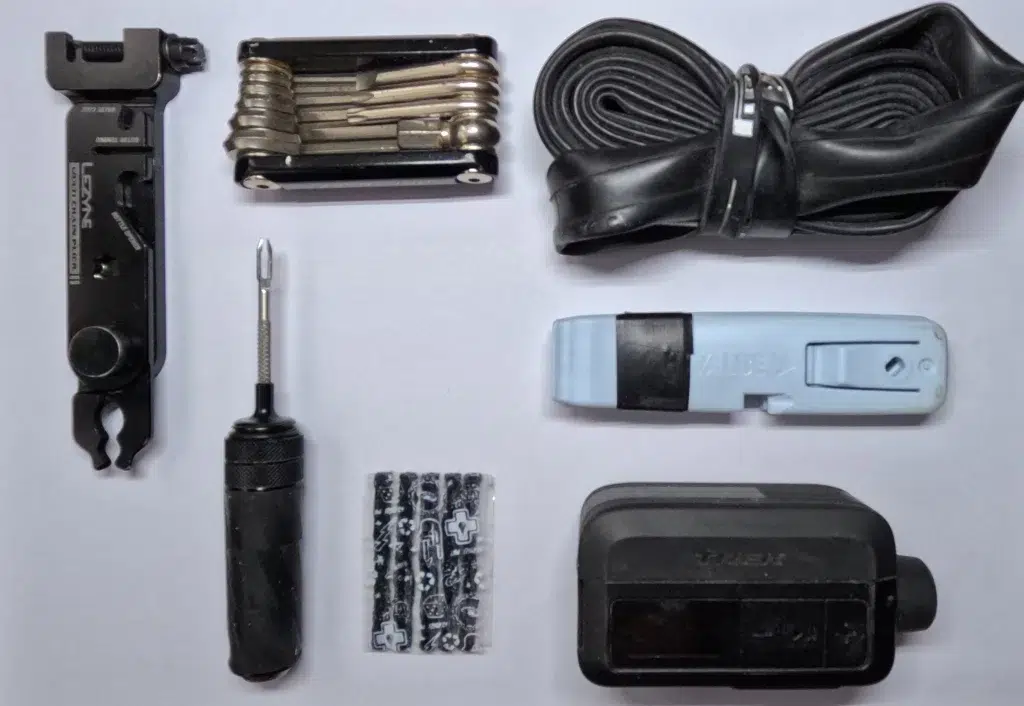
💡 Slow Lane Tip: Always carry a spare inner tube rather than relying on patches at the roadside. Replacing the tube usually takes just a few minutes and gets me moving again quickly. Once I’m home, I’ll repair the punctured tube and put it back in my saddle bag ready for the next ride.
Before You Start
It’s tempting to begin removing the wheel as soon as you notice a flat tyre, but taking a minute to think about your surroundings can make the repair much easier and much safer.
If you’ve punctured on a busy road, move somewhere safe before starting work. If it’s raining, look for shelter under a bridge or building canopy where you’ll stay warm and your tools won’t become soaked.
If you’re using a shared path, try not to block the cycle lane or pavement while you work. Moving just a few metres out of the way makes life easier for everyone.
If you’re carrying a backpack, pannier or valuables, keep them within arm’s reach. It’s surprisingly easy to become completely focused on repairing your bike and forget about your belongings.
Finally, remember that the first time you remove a tyre shouldn’t be at the side of the road.
💡 Slow Lane Tip: Spend half an hour practising at home before you ever need to repair a puncture for real. Getting familiar with your own bike, tyres and tools means you’ll stay much calmer if you ever have to fix a puncture during a ride.
Before Removing the Wheel
Before touching the wheel, there are a few small jobs that make the repair much easier.
If you’re repairing the rear wheel, shift into the smallest rear gear. This moves the chain onto the smallest sprocket, giving you more room and slack on the chain to remove the wheel.
Take off your helmet if you’re going to be leaning over the bike for a while; this one is simply to make the job more comfortable.
If you have lights, a bike computer or anything mounted to the handlebars, remove them before turning the bike over. It only takes a moment and helps prevent expensive accessories from getting damaged.
💡 Slow Lane Tip: If I need to turn the bike upside down, I always remove my lights and cycle computer first. Then I carefully rest the bike on the handlebars and saddle so the rear derailleur isn’t taking any weight. It’s a quick, stable setup that I’ve used for years when repairing punctures on the roadside.
Step 1: Remove the Wheel
The first step in any bike puncture fix is removing the affected wheel. How you do this depends on your bike, but don’t worry the process is straightforward once you’ve done it a couple of times.
If you’ve punctured the front wheel, simply undo the quick-release skewer, thru-axle or axle nuts and lift the wheel clear of the forks.
For the rear wheel, first shift into the smallest rear gear before releasing the wheel. This gives the chain the most slack and makes it much easier to remove the wheel from the frame.
If your bike has rim brakes, you may need to release the brake first to create enough space for the tyre to pass through. This is normally done by a little lever on the brake calipers themselves.
For disc brakes, avoid squeezing the brake lever once the wheel has been removed, as this can cause the brake pads to close together and stick. This can be fixed by the roadside but is best to avoid.
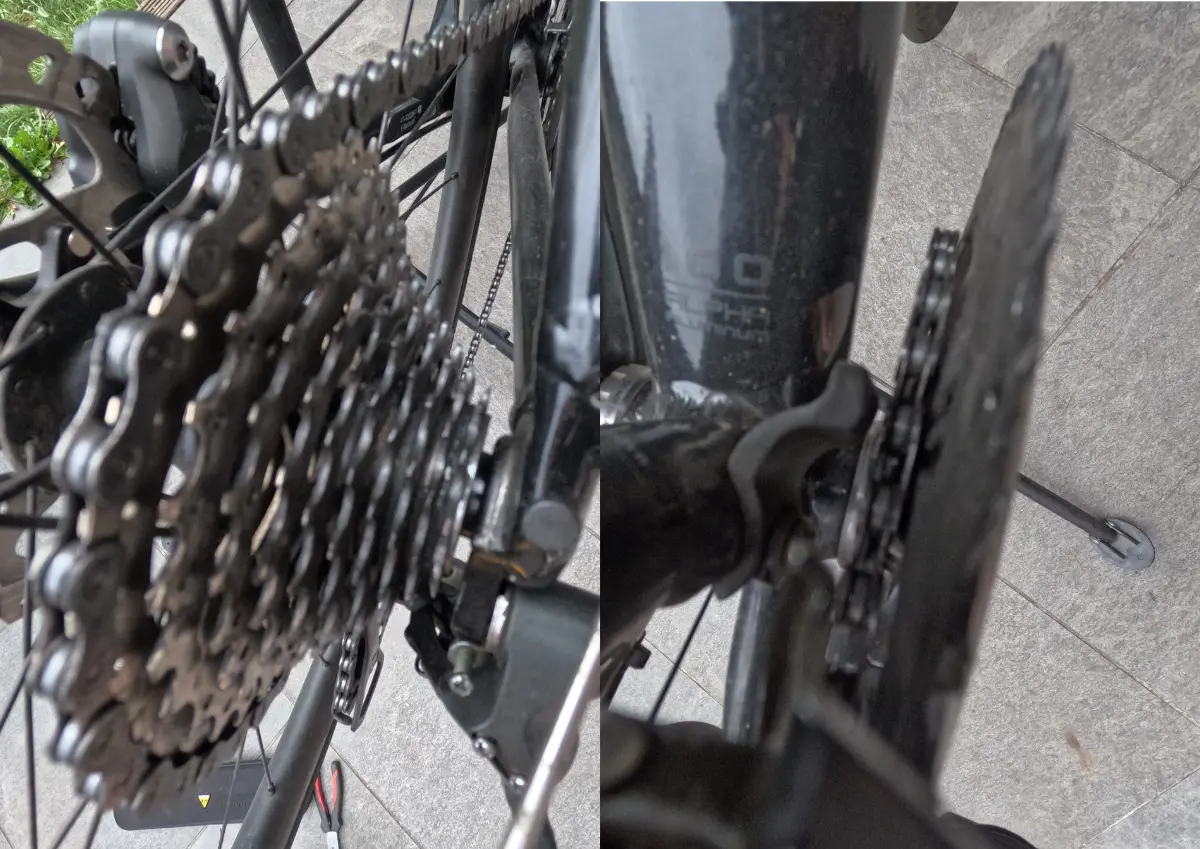
⚠️ Avoid This Mistake: Many beginners try to remove the rear wheel while the chain is on one of the larger gears. Selecting the smallest rear sprocket first makes the whole process much easier and avoids unnecessary frustration.
Step 2: Deflate the Tyre Completely
Even if the tyre already feels flat, press the valve to release any remaining air.
A fully deflated tyre is much easier to remove from the rim and reduces the risk of damaging the inner tube while working.
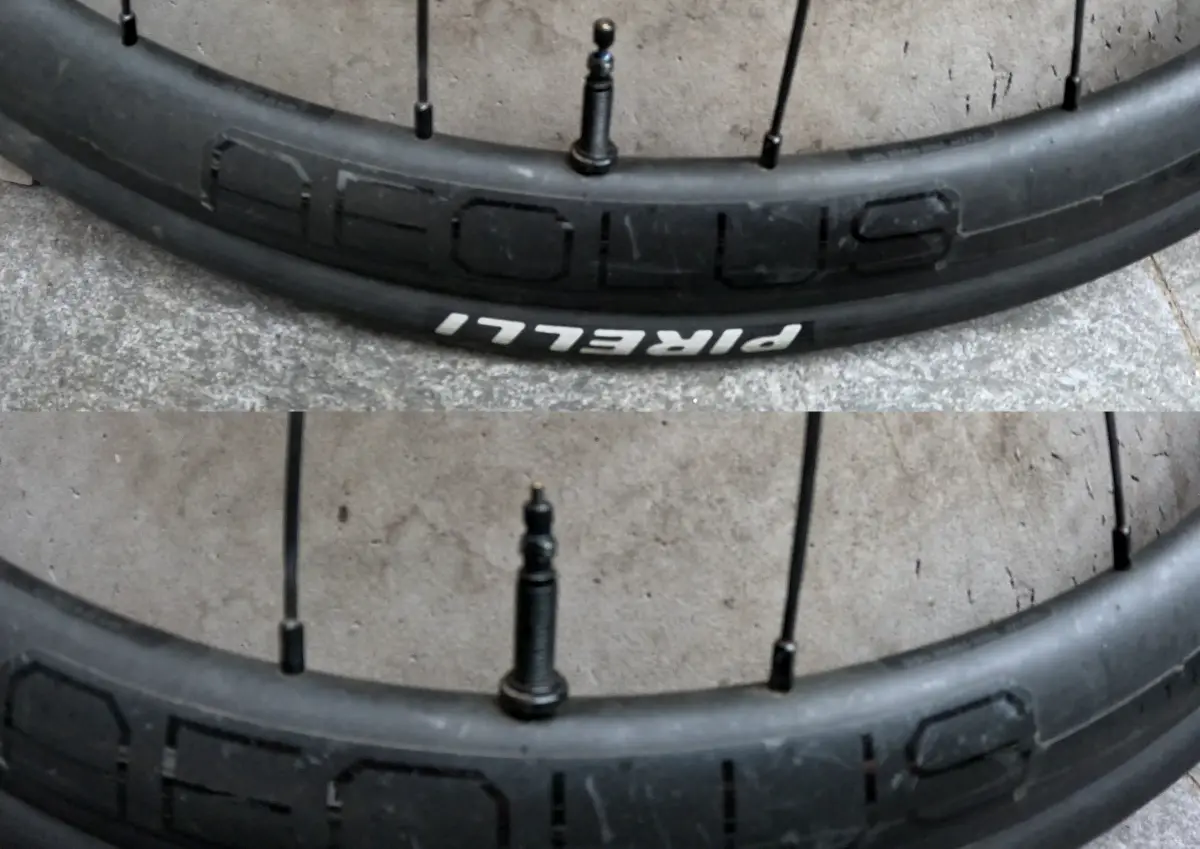
If your bike uses a Presta valve, unscrew the small locking nut before pressing the valve.
If you have a Schrader valve, simply press the pin in the centre.
Take a moment to identify which valve type your bike uses before you start. If you’re unsure, it’s best to look it up before you leave the house. It can depend on what pump attachment you need.
Step 3: Remove One Side of the Tyre
To access the damaged inner tube, you’ll only need to remove one side of the tyre from the rim.
Start opposite the valve and push the tyre bead into the centre channel of the rim. This creates a little extra slack and often makes removing the tyre much easier.
If the tyre is tight, insert a tyre lever beneath the bead and hook it onto a spoke. Use a second lever a short distance away to continue lifting the tyre over the rim.
Once a section of the bead is free, you can usually slide the lever around the rim or continue by hand. Ensure you only remove one side of the tyre. There’s no need to take the tyre off completely.
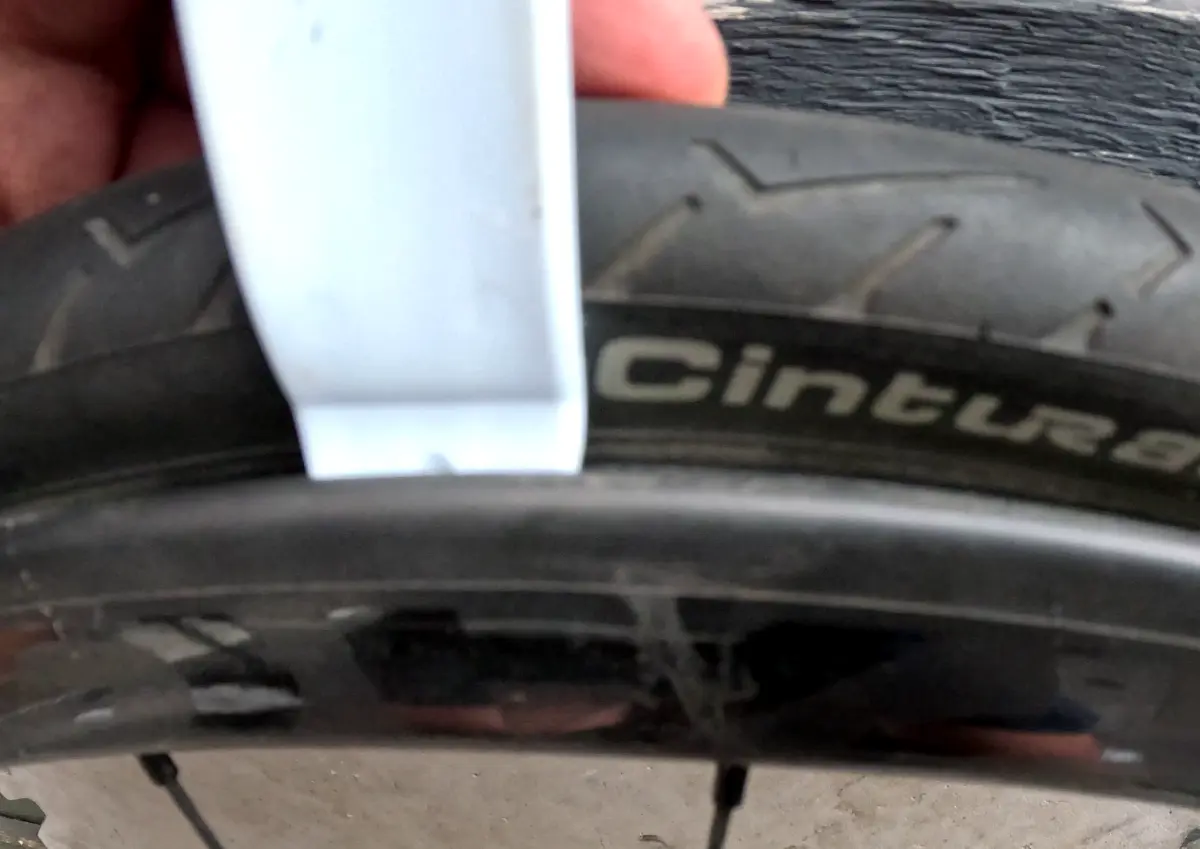
💡 Slow Lane Tip: Before reaching for the tyre levers, always try pushing the tyre bead into the deepest part of the rim. It’s surprising how many tyres that seem impossible to remove suddenly become much easier.
⚠️ Avoid This Mistake: Don’t use screwdrivers, keys or other metal objects instead of tyre levers. They’re likely to damage your rim, pinch the new tube or tear the tyre bead. They can also be incredibly dangerous if you slip with them.
Step 4: Remove the Inner Tube
With one side of the tyre free, now remove the inner tube by pulling it from inside the tyre. Make sure the valve screw is taken off so you can pull the last bit out once you get to the valve.
Start away from the valve and gently pull the tube out from inside the tyre. Leave the valve until last, then push it back through the rim and remove the rest of the tube.
Don’t throw the punctured tube away as you can repair it later and keep it as a spare. Or if you want to buy new, then take the inner tube somehwere you can recycle it.
Step 5: Find What Caused the Puncture
This is by far the most important step in the entire repair. I’m not ashamed to admit that I have fallen victim to skipping this step too many times.
If you simply fit a new inner tube without finding the cause of the puncture, there’s a good chance you’ll puncture the replacement tube within minutes.
Start by laying the old tube next to the tyre.
Use the valve as your reference point, then work around the tyre in the same direction.
Carefully feel around the inside of the tyre with your fingertips. You’re looking for anything sharp that’s still embedded in the rubber, such as:
- Glass
- Thorns
- Small pieces of wire
- Sharp flints
- Metal fragments
Once you’ve checked the inside, inspect the outside of the tyre visually.
Small pieces of glass can be surprisingly difficult to spot, especially if they’re almost flush with the tread.
💡 Slow Lane Tip: I always begin checking from the valve because it gives me a fixed starting point. Working methodically around the tyre means I know I’ve checked every section without missing anything. Feel gently rather than pressing hard. A tiny shard of glass can be surprisingly sharp.
⚠️ Avoid This Mistake: Never assume the object has fallen out. Many repeat punctures happen because a tiny piece of glass was still stuck in the tyre. Take your time with this step as it could save you repeating the entire repair.
Step 6: Decide Whether to Replace or Repair the Tube
At the roadside, replacing the tube is almost always the quickest option. You can simply fit your spare inner tube and continue your ride.
Once you’re home, you can repair the punctured tube using a puncture repair kit and keep it as your spare. If you don’t have a spare tube, you’ll need to repair the puncture before continuing.
Most puncture repair kits include:
- Sandpaper
- Rubber solution
- Self-adhesive or glue-on patches
- Instructions
A properly repaired inner tube can be just as reliable as a new one.
💡 Slow Lane Tip: I rarely repair tubes at the roadside unless I have no other choice. Replacing the tube gets me riding again much faster. I’ll repair the damaged tube later that evening while it’s warm, dry and there’s no pressure to get somewhere.
🚴 Beginner Confidence Boost
The first puncture repair often feels slow and awkward.
That’s completely normal.
Most cyclists can repair a puncture in around 15–20 minutes after a little practice, and experienced riders often manage it in less than ten.
The good news is that every puncture makes you quicker and more confident for the next one.
Step 7: Fit the New Inner Tube
Before fitting the new tube, add just enough air for it to hold its shape. This makes it less likely to twist or become trapped between the tyre and rim during installation.
Insert the valve through the valve hole first before gently tucking the rest of the tube inside the tyre. Work your way around the wheel, ensuring the tube sits evenly inside the tyre without any twists.
Take your time here. A properly positioned tube makes the next step much easier.
💡 Slow Lane Tip: A little air goes a long way. The tube only needs enough air to hold its shape but it shouldn’t be firm. This small step makes it much less likely you’ll accidentally pinch the tube while refitting the tyre.
Step 8: Refit the Tyre
Starting opposite the valve, push the tyre bead back inside the rim using your thumbs.
Continue working evenly around both sides until only a small section remains. The final section is usually the tightest. But resist the temptation to immediately reach for the tyre levers.
Instead, go back around the tyre squeezing both beads into the deepest part of the rim. This creates a little extra slack and often allows the final section to pop over by hand.
Only use tyre levers if absolutely necessary and take extra care not to pinch the new inner tube.
⚠️ Avoid This Mistake: The most common way to puncture a brand-new tube is by trapping it between the tyre and rim while using tyre levers.
If the tyre feels impossibly tight, don’t force it. Work the tyre beads back into the centre channel of the rim before trying again.
Step 9: Check for Trapped Tube
Before inflating the tyre, inspect both sides of the wheel. Look all the way around the rim to make sure no part of the inner tube is visible between the tyre bead and the rim.
This quick check only takes a few seconds but can prevent an immediate second puncture.
Step 10: Inflate the Tyre
Begin inflating the tyre slowly.
As the tyre starts to take shape, check that it is seated evenly all the way around the rim. Most tyres have a small mould line near the edge that should appear an equal distance from the rim on both sides. At a certain point you should here a pop as the bead on the tyre reposition themselves on the rim. Don’t panic, this is completely normal.
Once you’re happy everything looks correct, continue inflating the tyre to a safe riding pressure.
💡 Slow Lane Tip: If I’m repairing a puncture during a commute, I don’t worry about reaching full tyre pressure.
I simply inflate the tyre enough to ride safely to work or home. I’ll either visit a local bike shop during my lunch break or top the tyre up properly with a track pump later that day.
Until then, I’ll avoid potholes, kerbs and rough surfaces to reduce the chance of another pinch puncture or a rim strike.
Step 11: Refit the Wheel
Place the wheel back into the frame, ensuring it sits fully in the dropouts before tightening the quick-release, thru-axle or axle nuts.
If your bike has rim brakes, don’t forget to reconnect them before riding away. Spin the wheel to make sure it rotates freely and isn’t rubbing against the brake pads or frame.
Finally, squeeze both brake levers firmly to check they’re working correctly before getting back on the bike.
✅ Slow Lane Final Check
Before setting off again, spend 30 seconds checking:
- Wheel securely fitted.
- Brakes working correctly.
- Tyre seated evenly around the rim.
- Enough tyre pressure to ride safely.
- Lights and bike computer refitted.
- Tools packed away.
- Nothing left behind where you stopped.
Those few seconds could save another stop a mile down the road.
⚠️ Common Mistakes When Fixing a Bike Puncture
Even experienced cyclists occasionally make mistakes. Here are the most common ones to avoid:
- Not checking the inside of the tyre for the object that caused the puncture.
- Pinching the new inner tube with tyre levers.
- Forgetting to reconnect rim brakes.
- Inflating the tyre before checking the tube isn’t trapped.
- Fitting the wrong size inner tube.
- Riding away with very low tyre pressure.
- Leaving tools or belongings behind after the repair.
How to Help Prevent Future Punctures
Although punctures are impossible to avoid completely, a few simple habits can significantly reduce how often they happen.
Check Your Tyre Pressure
Underinflated tyres are much more likely to suffer pinch punctures when hitting potholes or kerbs.
Inspect Your Tyres Regularly
Small pieces of glass often become embedded in the tread long before they cause a puncture.
Replace Worn Tyres
Tyres with worn tread or visible casing offer much less protection against sharp objects.
Avoid Riding in the Gutter
Road debris naturally collects along the edge of the road. When it’s safe to do so, riding slightly further out often means riding on a much cleaner surface.
💡 Slow Lane Tip: One of the simplest ways I’ve reduced punctures over the years is by avoiding the gutter whenever possible.
It’s where broken glass, thorns and other debris naturally collect. Riding just a little further out, when it’s safe to do so, has made a noticeable difference.
You can always try switching to a tubeless setup, but we’ll discuss this in another article.
🚴 Beginner Practice Challenge
Rather than waiting until you’re stuck beside the road, spend half an hour practising at home.
Challenge yourself to:
- Remove a wheel.
- Take one side of the tyre off.
- Remove the tube.
- Refit everything.
- Inflate the tyre.
Time yourself if you like.
The first attempt might take 30 minutes. By your third attempt, you’ll probably finish in less than 10.
When you eventually get a puncture on a ride, you’ll be surprised how much more confident you feel.
FAQ: Common questions about changing a bike tyre
Is it better to replace or repair a bike inner tube?
If you’re out riding, replacing the tube is usually the quickest solution. You can repair the punctured tube later and keep it as a spare.
How long does a bike puncture fix take?
For most cyclists, around 15–20 minutes. With practice, many repairs take less than 10 minutes.
Can I fix a bike puncture without removing the wheel?
On most bikes, removing the wheel makes the repair much easier and is the recommended method.
Why did my new inner tube puncture straight away?
The most common causes are leaving the original object inside the tyre or trapping the new tube beneath the tyre bead during installation.
Should I carry a spare inner tube or a puncture repair kit?
Ideally, carry both. A spare tube gets you riding again quickly, while the repair kit allows you to fix the damaged tube once you’re home.
How often should I check my tyre pressure?
Checking your tyres once a week helps reduce punctures, improves grip and makes cycling more comfortable.
Bottom Line
Every cyclist gets a puncture eventually, but it doesn’t have to spoil your ride.
Learning how to fix a bike puncture is one of the most useful maintenance skills you can develop. Once you’ve practised it a few times, replacing an inner tube becomes a quick, straightforward job that can save you a long walk home.
Carry a few basic tools, stay methodical and don’t rush. Most repeat punctures happen because something small was missed rather than because the repair itself was difficult.
Whether you’re cycling to work, riding to the café or exploring your local trails, having the confidence to repair a puncture means you’re always ready to keep your ride going.
If this article was helpful. I’ve made an E-Book to help you in your first few weeks of cycle commuting. Just click the link below.
Any questions, get in touch using the contact page.
– Dan
Related Guides
- Presta vs Schrader Valves: What’s the Difference?
- How to Pump Up a Bike Tyre Correctly
- Essential Bike Tools Every Cyclist Should Carry
- How Often Should You Replace Bike Tyres?
- Beginner’s Guide to Basic Bike Maintenance